
Architecture
First, let's understand how ZFS snapshots work by looking at a simplistic example of writing a file and then overwriting it with new contents of the same size. In a traditional filesystem, let's say you have 3 files each with the following content:

If you want to overwrite the contents of file1.txt with a new string, baz, you'd write the changes to the file and the filesystem would replace the contents on disk in the same location:
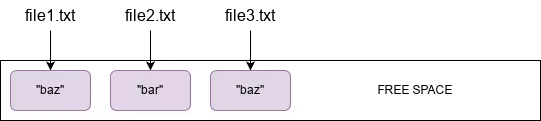
By contrast, ZFS is a copy-on-write filesystem, which means whenever you do a write, even if the file already exists, the write is written to free space (blocks marked as unused):
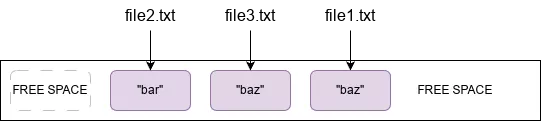
This is how ZFS can create a complete filesystem snapshot virtually instantaneously - it simply marks the point where the last write occurred and everything that occurred prior to that is part of the snapshot and everything that occurred after is not. This is an overly simplistic view of how it works (e.g. we haven't discussed fragmentation at all), but it gives you a rough idea of how the data is stored on-disk.
Creating a Snapshot
To create a snapshot called snapshot1 of the dataset called tank/example, run zfs snapshot tank/example@snapshot1. This will return nearly instantly and provide a snapshot you can now reference:
 1root@demo:~# zfs list -r tank
 2NAME           USED  AVAIL     REFER  MOUNTPOINT
 3tank           130K  39.9M       24K  /tank
 4tank/example  25.5K  39.9M     25.5K  /tank/example
 5root@demo:~# ls /tank/example
 6file1.txt  file2.txt  file3.txt
 7root@demo:~# cat /tank/example/file1.txt
 8foo
 9root@demo:~# cat /tank/example/file2.txt
10bar
11root@demo:~# cat /tank/example/file3.txt
12baz
13root@demo:~# zfs snapshot tank/example@snapshot1
14root@demo:~# zfs list -t snapshot tank/example
15NAME                     USED  AVAIL     REFER  MOUNTPOINT
16tank/example@snapshot1     0B      -     25.5K  -
Now let's change the contents of file1.txt as in the above diagram, take another snapshot, verify that the changes are present, and then remove file1.txt from the filesystem entirely:
 1root@demo:~# echo baz > /tank/example/file1.txt
 2root@demo:~# zfs snapshot tank/example@snapshot2
 3root@demo:~# zfs list -t snapshot tank/example
 4NAME                     USED  AVAIL     REFER  MOUNTPOINT
 5tank/example@snapshot1  12.5K      -     25.5K  -
 6tank/example@snapshot2     0B      -     25.5K  -
 7root@demo:~# cat /tank/example/file1.txt
 8baz
 9root@demo:~# rm /tank/example/file1.txt
10root@demo:~# zfs list -t snapshot tank/example
11NAME                     USED  AVAIL     REFER  MOUNTPOINT
12tank/example@snapshot1  12.5K      -     25.5K  -
13tank/example@snapshot2  12.5K      -     25.5K  -
You'll notice in the last command, the USED column for snapshot2 has changed; we'll come back to that in a minute. Now, let's verify that each snapshot contains the version of the file as it existed at that point-in-time. You can easily do this by browsing the filesystem as it existed when the snapshot was taken using the .zfs directory, which is hidden by default with the snapdir property:
1root@demo:~# zfs get snapdir tank/example
2NAME          PROPERTY  VALUE    SOURCE
3tank/example  snapdir   hidden   default
Here you can see all the files in snapshot1 and their contents:
1root@demo:~# cat /tank/example/.zfs/snapshot/snapshot1/file1.txt
2foo
3root@demo:~# cat /tank/example/.zfs/snapshot/snapshot1/file2.txt
4bar
5root@demo:~# cat /tank/example/.zfs/snapshot/snapshot1/file3.txt
6baz
And similarly with snapshot2:
1root@demo:~# cat /tank/example/.zfs/snapshot/snapshot2/file1.txt
2baz
3root@demo:~# cat /tank/example/.zfs/snapshot/snapshot2/file2.txt
4bar
5root@demo:~# cat /tank/example/.zfs/snapshot/snapshot2/file3.txt
6baz
And finally the live filesystem:
Each snapshot contains a number of properties that tell you more about the snapshot; run zfs get all tank/example@snapshot1 for example to see all of them for the snapshot1 snapshot. In particular, the origin property is useful to tell you exactly when the snapshot was created.
Understanding Used Space
Now, why did the USED column change after we removed file1.txt from the live filesystem? The answer is that the USED column represents the data that is unique to that snapshot, not present in the live filesystem or in other snapshots (more details). This can be confusing since as snapshots are created and destroyed, a snapshot can appear to change size if it's now the only snapshot holding a particular piece of data.
One other thing to consider with used space is the space allocated to snapshots verses the live filesystem. The actual size of your files may be small, but if they change frequently and you frequently create snapshots, you could end up filling up a large disk with all the unique data in each snapshot. To more easily distinguish between these two types of "used" space, use the -o space option:
1root@demo:~# zfs list -o space -r tank/example
2NAME          AVAIL   USED  USEDSNAP  USEDDS  USEDREFRESERV  USEDCHILD
3tank/example  39.8M    52K       27K     25K             0B         0B
As you can see with this small example, the snapshots are now over 50% of the space consumed for this dataset. Thus, it's important to plan for enough free space for your anticipated snapshot size when selecting the disks for your zpool.
Automating Creating and Destroying Snapshots with Sanoid
Raw ZFS commands for managing snapshots are straightforward, but there is no automation with creating snapshots or pruning them as they get old. Fortunately, sanoid is a powerful tool to take care of scheduling new snapshots and pruning old ones with ease. For example, you can take a snapshot every hour, every day, every week, every month, and every year as follows:
This would keep 12 hourly snapshots (for the most recent 12 hours), 7 daily, 4 weekly, 2 monthly, and 1 yearly. As noted in the instructions, simply schedule sanoid to run as a cron job every minute:
1* * * * * TZ=UTC /usr/local/bin/sanoid --cron
You can easily identify snapshots created with sanoid because they all start with autosnap_, e.g. autosnap_2024-04-09_00:00:00_daily.
Syncing Snapshots with Syncoid
Creating all these snapshots is useful, but it's especially powerful if we can sync them to another server which can act as a backup server or hot spare. The raw zfs send and zfs receive commands to do this can get complex, but fortunately syncoid makes this incredibly easy; if you've ever used rsync before, this will feel very familiar. For example, to sync to a backup server called mybackups, run the following:
1root@demo:~# syncoid --recursive tank/example user@mybackups:tank/example
You could choose to give the zpool on mybackups a different name, or even use a different dataset name too.
One important thing to note is that by default, syncoid captures anything in the live filesystem that isn't yet present in a snapshot by creating a temporary snapshot (prefixed with syncoid_) while syncing. If you don't need this behavior and just want to back up the snapshots, run it with the --no-sync-snap argument.
Bringing It All Together
Not only can you run sanoid on your active server, but you can also run it with a separate config file on the backup server. Let's say you have a lot of space on your backup server and can keep many more snapshots. Simple, just define the sanoid config with much larger retention values and tell sanoid to only prune snapshots but not create them (by setting autosnap = no):
ZFS makes creating snapshots quick and easy and sanoid and syncoid make it simple to automatically create, destroy, and sync snapshots. Using a filesystem with these powerful features doesn't have to require a lot of in-depth technical knowledge or huge time investment; simply set reasonable values when creating your zpool and harness these powerful tools to do the heavy lifting on your server.